hadoop分布式环境搭建二(集群搭建)
标签:hadoop, 分布式安装准备
1.在/opt目录下创建software及modules文件夹,并修改到为mac用户下
sudo mkdir /opt/software
[sudo] password for mac:
[mac@centos1 ~]$ sudo mkdir /opt/modules
[mac@centos1 ~]$ sudo chown -R mac:mac /opt/software/
[mac@centos1 ~]$ sudo chown -R mac:mac /opt/modules/
[mac@centos1 ~]$ ls -al /opt/
总用量 20
drwxr-xr-x.  5 root root 4096 2月  28 21:42 .
dr-xr-xr-x. 25 root root 4096 2月  28 21:18 ..
drwxr-xr-x.  2 mac  mac  4096 2月  28 21:42 modules
drwxr-xr-x.  2 root root 4096 2月  22 2013 rh
drwxr-xr-x.  2 mac  mac  4096 2月  28 21:41 software
2.上传软件到/opt/software目录下
首先下载jdk及hadoop软件,下载地址为链接: https://pan.baidu.com/s/1nu8IrbV 密码: g9te
在自己的mac电脑上使用scp命令将两个文件上传到centos1系统的opt/software目录下
mac:~ mac$ scp ~/Downloads/jdk-7u67-linux-x64.tar.gz ~/Downloads/hadoop-2.5.0.tar.gz centos1:/opt/software
mac@centos1's password:
jdk-7u67-linux-x64.tar.gz                     100%  136MB  37.5MB/s   00:03
hadoop-2.5.0.tar.gz                           100%  297MB  35.4MB/s   00:08
进入centos1的/opt/software目录下查看是否上传成功
[mac@centos1 ~]$ ls -al /opt/software/
总用量 443180
drwxr-xr-x. 2 mac  mac       4096 2月  28 21:53 .
drwxr-xr-x. 5 root root      4096 2月  28 21:42 ..
-rwxr-xr-x. 1 mac  mac  311430119 2月  28 21:53 hadoop-2.5.0.tar.gz
-rwxr-xr-x. 1 mac  mac  142376665 2月  28 21:53 jdk-7u67-linux-x64.tar.gz
将jdk复制到centos2和centos3,hadoop软件临时不需要上传到centos2和centos3中,等最后配置文件全部配置好了之后再复制即可
mac:~ mac$ scp ~/Downloads/jdk-7u67-linux-x64.tar.gz  centos2:/opt/software
mac@centos2's password:
jdk-7u67-linux-x64.tar.gz                     100%  136MB  45.2MB/s   00:03
mac:~ mac$ scp ~/Downloads/jdk-7u67-linux-x64.tar.gz  centos3:/opt/software
mac@centos3's password:
jdk-7u67-linux-x64.tar.gz                     100%  136MB  38.2MB/s   00:03
mac:~ mac$
3.解压jdk并配置环境变量,该操作需要在三台电脑中都要进行配置
[mac@centos1 ~]$ tar -zxvf /opt/software/jdk-7u67-linux-x64.tar.gz -C /opt/modules/
配置环境变量
vi ~/.bashrc
添加下面内容
export JAVA_HOME=/opt/modules/jdk1.7.0_67
export CLASS_PATH=$JAVA_HOME/lib
export PATH=$PATH:$JAVA_HOME/bin:$CLASS_PATH
最后执行source操作使其生效
source ~/.bashrc
验证jdk是否配置正确
java

javac


java -version
java version "1.7.0_09-icedtea"
OpenJDK Runtime Environment (rhel-2.3.4.1.el6_3-x86_64)
OpenJDK 64-Bit Server VM (build 23.2-b09, mixed mode)
同样需要在centos2和centos3中进行配置
4.解压hadoop压缩包到modules目录下,并删除hadoop目录下占用很多空间的的doc帮助文档
[mac@centos1 modules]$ tar -zxvf /opt/software/hadoop-2.5.0.tar.gz -C /opt/modules/

rm -rf /opt/modules/hadoop-2.5.0/share/doc/
5.切换到hadoop配置文件目录,修改env文件及site配置文件
cd /opt/modules/hadoop-2.5.0/etc/hadoop
首先注意这里有两类配置文件,只读性质的default配置文件及可修改的Site配置文件
这里使用sublime的package control插件sftp进行远程修改文件
安装完成后进入file->sftp/ftp->SetUp Server
进行centos1相关配置
{
    // The tab key will cycle through the settings when first created
    // Visit http://wbond.net/sublime_packages/sftp/settings for help

    // sftp, ftp or ftps
    "type": "sftp",

    "sync_down_on_open": true,
    "sync_same_age": true,

    "host": "centos1",
    "user": "mac",
    "password": "qwer1234",
    "port": "22",

    "remote_path": "/opt/",
    //"file_permissions": "664",
    //"dir_permissions": "775",

    //"extra_list_connections": 0,

    "connect_timeout": 30,
    //"keepalive": 120,
    //"ftp_passive_mode": true,
    //"ftp_obey_passive_host": false,
    //"ssh_key_file": "~/.ssh/id_rsa",
    //"sftp_flags": ["-F", "/path/to/ssh_config"],

    //"preserve_modification_times": false,
    //"remote_time_offset_in_hours": 0,
    //"remote_encoding": "utf-8",
    //"remote_locale": "C",
    //"allow_config_upload": false,
}
同样配置centos2和centos3的相关配置
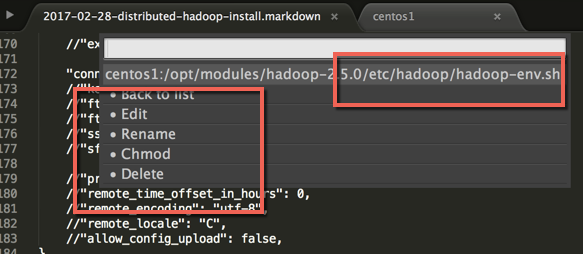
配置完成后就可以通过file->sftp/ftp->Browser file进行远程修改文件了
比如对centos1的文件进行修改
6.主机角色分配
namenode centos1

datanode centos1 centos2 centos3

resourcemanager centos2

nodemanager  centos1 centos2 centos3

seconderynamenode centos3
7.修改配置文件
修改hadoop-env.sh、mapred-env.sh、yarn-env.sh文件中的JAVA_HOME
export JAVA_HOME=/opt/modules/jdk1.7.0_67
8.在hadoop目录下创建数据目录
mkdir -p data/tmp
9.修改core-site.xml配置文件
<configuration>
    <property>
         <name>fs.defaultFS</name>
         <value>hdfs://centos1:8020</value>
    </property>
    <property>
        <name>hadoop.tmp.dir</name>
        <value>/opt/modules/hadoop-2.5.0/data/tmp</value>
    </property>
</configuration>
10.修改hdfs-site.xml文件,配置secondarynamenode的相关信息
<configuration>
    <property>
        <name>dfs.namenode.secondary.http-address</name>
        <value>centos3:50090</value>
    </property>
</configuration>
11.修改slaves配置文件内容,将centos1 centos2 centos3主机名称都加入到slaves配置文件中
centos1

centos2

centos3
12.配置centos2为resourcemanager资源管理器,修改yarn-site.xml
<configuration>
	<property>
      <name>yarn.resourcemanager.hostname</name>
      <value>centos2</value>
	</property>
	<property>
      <name>yarn.nodemanager.aux-services</name>
      <value>mapreduce_shuffle</value>
	</property>
	<property>
      <name>yarn.log-aggregation-enable</name>
      <value>true</value>
	</property>
	<property>
      <name>yarn.log-aggregation.retain-seconds</name>
      <value>640800</value>
	</property>
</configuration>
13.修改mapreduce-site的模板文件为mapreduce-site.xml,并修改为
<configuration>
  <property>
      <name>mapreduce.framework.name</name>
      <value>yarn</value>
  </property>
  <property>
      <name>mapreduce.jobhistory.address</name>
      <value>centos1:10020</value>
  </property>
  <property>
        <name>mapreduce.jobhistory.webapp.address</name>
        <value>centos1:19888</value>
  </property>
</configuration>
到这里hadoop的配置文件算是修改结束
14.分发hadoop目录到各个节点下,由于hadoop集群之间使用ssh秘钥登录,因此hadoop主机之间需要能够进行相互之间的访问,这里为了省事就直接配置为相互都可以访问
在每台机器上都执行ssh-keygen的命令如下,过程中一路回车 :
ssh-keygen -t  rsa
Generating public/private rsa key pair.
Enter file in which to save the key (/home/mac/.ssh/id_rsa):
Enter passphrase (empty for no passphrase):
Enter same passphrase again:
Your identification has been saved in /home/mac/.ssh/id_rsa.
Your public key has been saved in /home/mac/.ssh/id_rsa.pub.
The key fingerprint is:
e1:1d:e6:2c:ac:98:00:54:70:c0:9c:7e:7f:bb:1b:8c mac@centos1
The key's randomart image is:
+--[ RSA 2048]----+
|o+=o             |
|.+.              |
|o       . o      |
| o .   o * .     |
|  o .   S +      |
|   . +oo .       |
|    oEoo.        |
|       ..        |
|       oo        |
+-----------------+
然后使用ssh-copy-id将公钥复制到另外两台机器上,本身也需要操作
ssh-copy-id centos1


ssh-copy-id centos2

ssh-copy-id centos3
执行结束后分别用ssh链接其他机器测试下是否还需要登陆密码,如果不需要则证明成功
然后复制分发hadoop到centos2和centos3相同目录下
因此在centos1上执行下面命令
scp -r /opt/modules/hadoop-2.5.0/ centos2:/opt/modules/

scp -r /opt/modules/hadoop-2.5.0/ centos3:/opt/modules/
验证下centos2和centos3下是否存在hadoop目录了
[mac@centos2 ~]$ ls -al /opt/modules/
总用量 16
drwxr-xr-x.  4 mac  mac  4096 3月   1 04:44 .
drwxr-xr-x.  5 root root 4096 2月  28 21:56 ..
drwxr-xr-x. 10 mac  mac  4096 3月   1 04:44 hadoop-2.5.0
drwxr-xr-x.  8 mac  mac  4096 7月  26 2014 jdk1.7.0_67

[mac@centos3 ~]$ ls -al /opt/modules/
总用量 16
drwxr-xr-x.  4 mac  mac  4096 2月  28 20:44 .
drwxr-xr-x.  5 root root 4096 2月  28 13:56 ..
drwxr-xr-x. 10 mac  mac  4096 2月  28 20:44 hadoop-2.5.0
drwxr-xr-x.  8 mac  mac  4096 7月  26 2014 jdk1.7.0_67
15.在centos1中格式化hdfs文件系统
./bin/hdfs namenode -format
17/03/01 04:53:24 INFO namenode.NameNode: STARTUP_MSG:
/************************************************************
STARTUP_MSG: Starting NameNode
STARTUP_MSG:   host = centos1.com/192.168.4.131
STARTUP_MSG:   args = [-format]
STARTUP_MSG:   version = 2.5.0

17/03/01 04:53:26 INFO common.Storage: Storage directory /opt/modules/hadoop-2.5.0/data/tmp/dfs/name has been successfully formatted.
17/03/01 04:53:27 INFO namenode.NNStorageRetentionManager: Going to retain 1 images with txid >= 0
17/03/01 04:53:27 INFO util.ExitUtil: Exiting with status 0
17/03/01 04:53:27 INFO namenode.NameNode: SHUTDOWN_MSG:
/************************************************************
SHUTDOWN_MSG: Shutting down NameNode at centos1.com/192.168.4.131
************************************************************/
...
16.启动hdfs文件系统
./sbin/start-dfs.sh

17/03/01 04:58:43 WARN util.NativeCodeLoader: Unable to load native-hadoop library for your platform... using builtin-java classes where applicable
Starting namenodes on [centos1]
centos1: starting namenode, logging to /opt/modules/hadoop-2.5.0/logs/hadoop-mac-namenode-centos1.out
centos2: starting datanode, logging to /opt/modules/hadoop-2.5.0/logs/hadoop-mac-datanode-centos2.out
centos1: starting datanode, logging to /opt/modules/hadoop-2.5.0/logs/hadoop-mac-datanode-centos1.out
centos3: starting datanode, logging to /opt/modules/hadoop-2.5.0/logs/hadoop-mac-datanode-centos3.out
Starting secondary namenodes [centos3]
centos3: starting secondarynamenode, logging to /opt/modules/hadoop-2.5.0/logs/hadoop-mac-secondarynamenode-centos3.out
17/03/01 04:59:03 WARN util.NativeCodeLoader: Unable to load native-hadoop library for your platform... using builtin-java classes where applicable
分别检测进程是否启动成功
centos1上
jps
12561 Jps
12244 NameNode
12341 DataNode
centos2上
[mac@centos2 ~]$ jps
11096 DataNode
11157 Jps
centos3上
jps
9970 DataNode
10059 SecondaryNameNode
10100 Jps
17.在centos2上启动yarn资源管理器
./sbin/start-yarn.sh
starting yarn daemons
resourcemanager running as process 11402. Stop it first.
centos2: starting nodemanager, logging to /opt/modules/hadoop-2.5.0/logs/yarn-mac-nodemanager-centos2.out
centos3: starting nodemanager, logging to /opt/modules/hadoop-2.5.0/logs/yarn-mac-nodemanager-centos3.out
centos1: starting nodemanager, logging to /opt/modules/hadoop-2.5.0/logs/yarn-mac-nodemanager-centos1.out
查看进程是否启动成功
centos2
[mac@centos2 hadoop-2.5.0]$ jps
11096 DataNode
11402 ResourceManager
11993 Jps
11875 NodeManager
centos1上
[mac@centos1 hadoop-2.5.0]$ jps
13476 NodeManager
12244 NameNode
12341 DataNode
13574 Jps
centos3上
 jps
13401 DataNode
13939 NodeManager
13485 SecondaryNameNode
14129 Jps
这里试了很多次 每次都是nodemanager启动后关闭原因是防火墙的问题,需要将三台虚拟机的防火墙全部关闭
sudo service iptables stop
并将开启启动也关闭
sudo chkconfig iptables off
验证是否关闭成功
sudo chkconfig --list | grep iptables
iptables        0:关闭  1:关闭  2:关闭  3:关闭  4:关闭  5:关闭  6:关闭
18.启动日志服务器
./sbin/mr-jobhistory-daemon.sh start historyserver
starting historyserver, logging to /opt/modules/hadoop-2.5.0/logs/mapred-mac-historyserver-centos3.out
[mac@centos3 hadoop-2.5.0]$ jps
2492 Jps
2461 JobHistoryServer
2226 SecondaryNameNode
2126 DataNode
2313 NodeManager
19.启动wordcount程序测试下是否有问题
首先上传一个文件到hdfs系统上
./bin/hdfs dfs -mkdir -p /usr/mac

./bin/hdfs dfs -copyFromLocal etc/hadoop/log4j.properties /usr/mac
执行wordcount程序
./bin/yarn jar share/hadoop/mapreduce/hadoop-mapreduce-examples-2.5.0.jar wordcount /usr/mac /usr/mac/output
执行过程
17/03/01 14:01:20 WARN util.NativeCodeLoader: Unable to load native-hadoop library for your platform... using builtin-java classes where applicable
17/03/01 14:01:21 INFO client.RMProxy: Connecting to ResourceManager at centos2/192.168.4.132:8032
17/03/01 14:01:22 INFO input.FileInputFormat: Total input paths to process : 1
17/03/01 14:01:22 INFO mapreduce.JobSubmitter: number of splits:1
17/03/01 14:01:22 INFO mapreduce.JobSubmitter: Submitting tokens for job: job_1488347393190_0002
17/03/01 14:01:23 INFO impl.YarnClientImpl: Submitted application application_1488347393190_0002
17/03/01 14:01:23 INFO mapreduce.Job: The url to track the job: http://centos2:8088/proxy/application_1488347393190_0002/
17/03/01 14:01:23 INFO mapreduce.Job: Running job: job_1488347393190_0002
17/03/01 14:01:31 INFO mapreduce.Job: Job job_1488347393190_0002 running in uber mode : false
17/03/01 14:01:31 INFO mapreduce.Job:  map 0% reduce 0%
17/03/01 14:01:38 INFO mapreduce.Job:  map 100% reduce 0%
17/03/01 14:01:44 INFO mapreduce.Job:  map 100% reduce 100%
17/03/01 14:01:44 INFO mapreduce.Job: Job job_1488347393190_0002 completed successfully
17/03/01 14:01:45 INFO mapreduce.Job: Counters: 49
  File System Counters
    FILE: Number of bytes read=11936
    FILE: Number of bytes written=217707
    FILE: Number of read operations=0
    FILE: Number of large read operations=0
    FILE: Number of write operations=0
    HDFS: Number of bytes read=11227
    HDFS: Number of bytes written=10525
    HDFS: Number of read operations=6
    HDFS: Number of large read operations=0
    HDFS: Number of write operations=2
  Job Counters
    Launched map tasks=1
    Launched reduce tasks=1
    Data-local map tasks=1
    Total time spent by all maps in occupied slots (ms)=4779
    Total time spent by all reduces in occupied slots (ms)=4448
    Total time spent by all map tasks (ms)=4779
    Total time spent by all reduce tasks (ms)=4448
    Total vcore-seconds taken by all map tasks=4779
    Total vcore-seconds taken by all reduce tasks=4448
    Total megabyte-seconds taken by all map tasks=4893696
    Total megabyte-seconds taken by all reduce tasks=4554752
  Map-Reduce Framework
    Map input records=265
    Map output records=614
    Map output bytes=13507
    Map output materialized bytes=11936
    Input split bytes=109
    Combine input records=614
    Combine output records=352
    Reduce input groups=352
    Reduce shuffle bytes=11936
    Reduce input records=352
    Reduce output records=352
    Spilled Records=704
    Shuffled Maps =1
    Failed Shuffles=0
    Merged Map outputs=1
    GC time elapsed (ms)=117
    CPU time spent (ms)=1250
    Physical memory (bytes) snapshot=313421824
    Virtual memory (bytes) snapshot=1680121856
    Total committed heap usage (bytes)=136122368
  Shuffle Errors
    BAD_ID=0
    CONNECTION=0
    IO_ERROR=0
    WRONG_LENGTH=0
    WRONG_MAP=0
    WRONG_REDUCE=0
  File Input Format Counters
    Bytes Read=11118
  File Output Format Counters
    Bytes Written=10525
最后查看hdfs上的文件输出结果
./bin/hdfs dfs -cat /usr/mac/output/*
17/03/01 14:02:47 WARN util.NativeCodeLoader: Unable to load native-hadoop library for your platform... using builtin-java classes where applicable
"AS 1
"License"); 1
"console" 1
"hadoop.root.logger". 1
# 87
#Default  1
#Security 1

......
至此 hadoop集群环境搭建完毕.
本文的配置文件相关路径为https://github.com/CodeToSurvive1/bigdataproject/tree/master/src/main/resources/distribute/hadoop
原创文章,转载请注明出处!
本文链接:https://codetosurvive1.github.io/posts/distributed-hadoop-install.html